File Mapping Wizard
The File Mapping Wizard enables the creation of a template for reading data from a CSV/Excel File. Create the template once and use it going forward for future files with the same data layout. Its simple user interface will show you the data contained in file you wish to import and select the coresponding
QuickBooks element in the file. The following outlines the process for creating or modifying a file mapping.
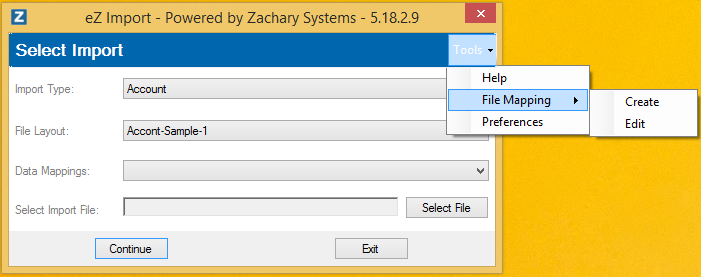
Select Create/Modify Mapping
On eZ Import's main window, select the Tools->File Mappings->Create (or Modify to change existing file mapping) a file mapping. The Select File Maping window will be displayed.
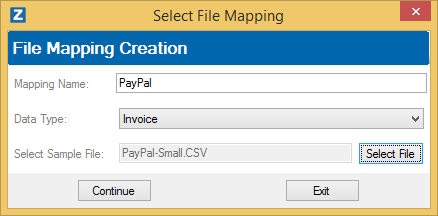
Select Mapping Type
The next step is to enter the Mapping Name, select the type of data to import and a sample file of the data. Click the Continue button to create the file mapping.
Create Mapping
The final step is the creation of the mapping. The File Mapping Window will display the data contained in the sample file selected previously while allowing the selection the QuickBooks Data Item a column in the file represents.
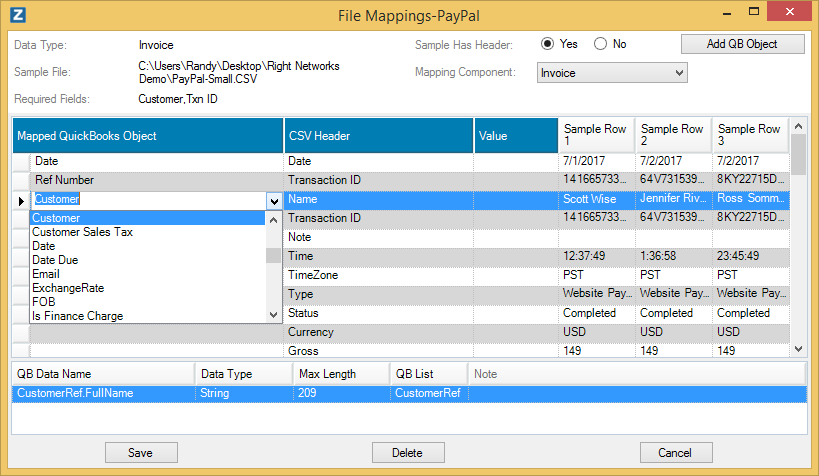
*Please note, your window might have different columns based upon the File Mapping you selected.
The window contains the following elements:
| Element
|
Description
|
|
Sample Has Header radio buttons
|
Indicates whether the file to import has a row containing a header
|
|
Add QuickBooks Object button
|
Adds a new row to the mapping grid. A new row might allow the same column in the import file to be used for a data item. For example, use the same date in file for due
date and date of transaction. Or the file might not have a column which is requried during import. For example, Class is not in file but is needed during import.
|
|
Mapping Component Drop down
|
This is only shown for transactions which have multiple levels of data. For example, an invoice has the header information, line items and potentially customers. This allows the mapping of each separately.
|
|
Mapping Grid
|
The grid shows the header for the import file as well as three rows of information. In addition, it allows the selection of QuickBooks data items and setting of constant values.
|
| Mapping Grid - Mapped QuickBooks Object Column
|
This column allows the selection of the QuickBooks Item for the column in the import file. It will contain all valid items for the component being mapped.
|
| Mapping Grid - Value Column
|
This column allows setting of a constant for a QuickBooks Value.
|
|
Save button
|
Saves the File Mapping
|
|
Delete button
|
Deletes the File Mapping
|
|
Cancel button
|
Cancels changes to the File Mapping.
|