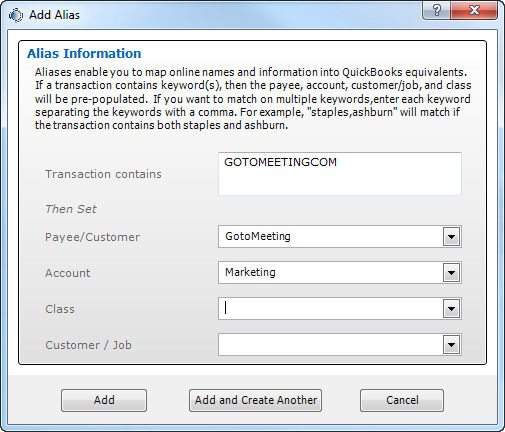
Add Alias Window

Add Alias Window
The Add Aliases window enables users to create “aliases.” Aliases are payees, accounts, classes and customer/jobs that you pre-define (note: Classes and Customer/Jobs need to be enabled in Preferences). Therefore, when eZ Account Import reads an online bank export file and an alias is encountered, a pre-defined payee, account, class and customer/job is automatically pre-populated in the Import Transactions window.
By creating aliases, users are not required to have a one-for-one match between online transaction descriptions and payees within their accounting software. Utilizing aliases also eliminates the possible issues faced when vendors add transaction identifiers, such as store number or date, to transactions.
For example, if the import file contains a transaction description such as “Staples Store 2311 Ashburn,” the user may set up an alias that sets the transaction to your Staples Vendor with an expense account of “Office Supplies” whenever the transaction description contain “Staples.”
Aliases can also be made from a combination of keywords enabling more granular matching. For example, the user can have a transaction description such as “Transfer on 11/20 to Account #212311”. To correctly assign a payee/account the user needs to match both the words: “Transfer” and “#212311”. In this case the user just needs to enter “Transfer” and “#212311” as keywords separated by a comma, like “Transfer,#212311”. There should not be a space be a space after the comma.
The Aliases window is accessed from the Import Transactions window by right-clicking on the Transactions in Import File table’s to view the context menu.
The window contains the following elements:
| Element
|
Description
|
|
Transaction contains field
|
Keywords to use when matching the transaction descriptions. For multiple keywords, separate with commas. For example, “Lowes, Ashburn” will match any transaction containing both the word Lowes and Ashburn. Do not put a space between the comma.
|
|
Payee/ Customer field
|
Is set to the Name of the vendor you are creating.
|
|
Account drop-down
|
Drop-down list of accounts available in QuickBooks.
|
|
Class drop-down
|
Enables the setting of the class for the Alias if classes are enabled in Preferences.
|
|
Customer/Job drop-down
|
Allows you to assign customer/job for the Alias if enabled in Preferences.
|
|
Add button
|
Saves and adds the Alias to eZ Account Import.
|
|
Add and Create Another button
|
Saves and adds the first Alias entry and then creates a new blank form to add another Alias.
|
|
Cancel button
|
Indicates whether an alias should be created in eZ Account Import as well as the vendor/customer.
|
|
? (Help)
|
Takes you to the ZSI Support webpage.
|